Fix a wobbly wheel for under $10
Biking Skills
August 10th 2019
Over enough years, every rider has had it happen sometime. First, you start hearing the “thwip, thwip” sound of your rim hitting the brake on each wheel revolution. Even carefully re-adjusting the wheel alignment doesn’t help because…the wheel is bent. Riding it like that will wear down one brake pad more than the other.
Now what?
Well, now you have a choice. You can pay for a new wheel, pay a local bike shop to fix your wheel, or “true” the wheel yourself.

Buy a new wheel??? Well, yes, sometimes.
If you’re buying a new wheel, expect to spend at least $80. Sometimes much, much more.

$4,150 for a Meilenstein Obermayer Schwarz wheel, anybody?
If the wheel is fixable–it generally looks good but has a wobble–you can expect your local bike shop to charge $20 – $30 to true it using professional equipment like a truing stand for the perfect line and roundness.

You can also buy a professional truing stand for about $50 to $80, or the gold-standard Park Tools stand like this for $300. If you really like truing wheels.
Or… the $10 solution to warped wheels.
But the fastest, cheapest way to fix it is to do it yourself with just a leg strap and a spoke tool. This is something you can do even on the trails, when no other options are available.

These (and some knowledge) can fix a warped wheel anywhere.
Spoke wrenches don’t have to look like ours above. They come in many shapes and sizes, are universally inexpensive…
…and can even be discreetly part of something else, like this D-ring.
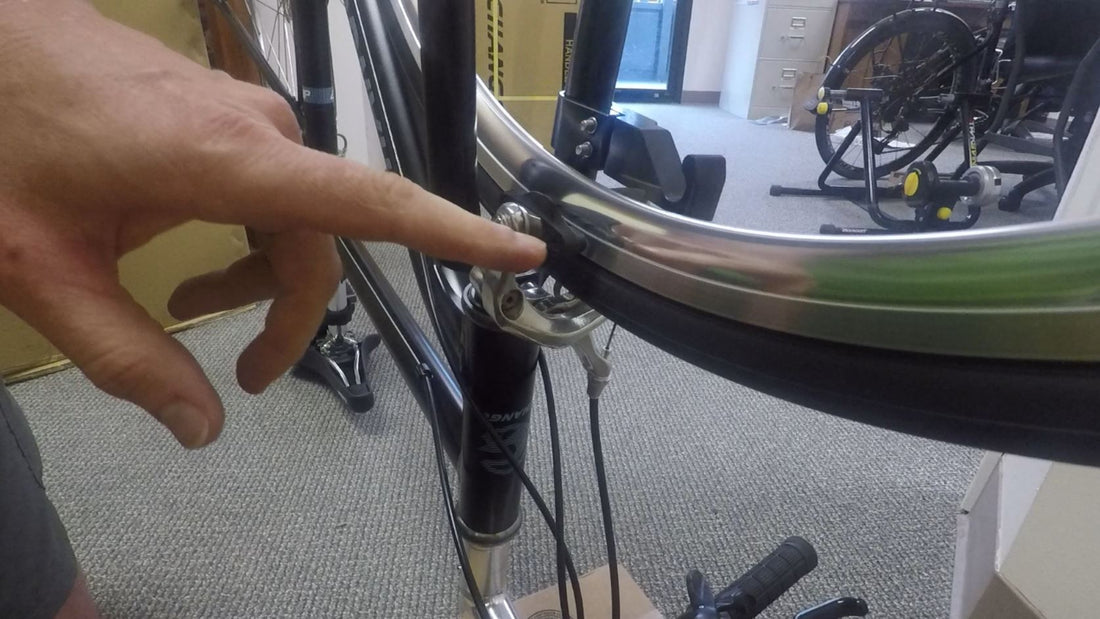
Yet even the best tool is no good unless you know how to use it. Your leg strap will be used on the appropriate brake grip for the problem wheel on an inverted bike, pulling your brake pads in just enough to rub at the worst point on the wheel. You now know where the problem is, and which side of a pull (left or right) needs to be fixed.
On your rim, your spokes alternate between those that attach to the left side of your axle and those that attach to the right side. We call those left and right spokes. You will straighten your wheel by loosening and tightening spokes, as long as you remember these 3 rules:
- Remember clockwise or counter-clockwise (anti-clockwise in the UK and Australia). To pull to one side, tighten that side’s spoke–clockwise turn, as seen from the rim/tire side. Half or quarter turns are all you need.
- Loosen as you tighten. Every time you tighten a spoke, loosen a nearby opposing spoke by the same amount. This keeps the rim from getting overtightened and “out of round.”
- Cinch the brake tighter every time you get the rim to stop rubbing on one side.
That’s a lot of words. Here it is in action, with an out-of-true wheel we caught during our Flatbike 14-point quality check for incoming CHANGE bikes. (It can’t go to a customer, so we used it as a demo opportunity.)
In a quick 15-minute effort, we got a massively out-of-true wheel to be safe on the brakes. Observant wheel-truing experts will notice that, even with this massive improvement, the wheel still is still what we call “out of round.” To fix that without a truing stand, use a piece of masking tape like this.

Adjust the masking tape like you did the brake calipers, bringing it in slightly tighter every time your wheel no longer touches. We’re talking millimeters.
To fix out-of round, you’ll be tweaking both side spokes at a time, 1/4 turn or less. It takes more time and more patience than side-to-side, so put some tunes on.
But the end result is a perfectly trued wheel, and a lot more life out of your current wheel and brake pads.
See you–but won’t hear you coming–out on the roads!
Bob Forgrave is president of Flatbike, an
ecommerce company offering full-size folding bikes
and kits to make any bike take up half the space.
39 responses to “Fix a wobbly wheel for under $10”
Excellent.
First timer and got my wheels to acceptable levels from following your advice.
Thank you.
Fantastic! Glad we could help.
Truing wheels is hands down my least favorite bit of maintenance. But, just like any other maintenance, it is necessary to get the most out of your bike. And, if you are an absolute cheapskate like me, it is a great way to breath new life into the same wheels for as long as they hold a circle.
Worked like a charm thanks for saving me two trips to the bike shop!
This is awesome. We’re helping all sorts of folks with this!
Wow, you made it to where it easy to understand. Im a new biker and don’t know the names of a lot of the parts. But you simplified it in a way thats easy to understand. Amazing! Keep it up!
Thanks for the vote of support, Danny. Simplifying biking challenges and solutions is our goal throughout the Convenient Cyclist blog.
So I have a bike with coaster brakes. What can I use to true that wheel? Hmm…
That’s a fascinating question, Mike. The same principle of tweaking 2 spokes one way and 1 spoke the other still applies. What you’re missing with no caliper brakes is the ability to measure accurately which way to go.
You may need to eyeball it from a defined reference point. Does the place in the frame where a caliper brake would go have a hole, for a brake or fender mount? If so, it’s centrally located and is a good reference point. Now you just need to know if there’s more tire or wheel on one side of the point or the other.
If you’re doing this tireless, then you can compare the rim strip to that point or the spoke heads under it, seeing if they go left or right. If your tire is on, try looking for a center mark or zone on the tire.
Nice trick on the out-of-round portion though I’d like to see it explained in a little more detail. While thinking about that, is it possible to correct a slight simple across the wheel? I was thinking of a body shop trick to use a hammer and weight to hammer it back smooth. Had a crash on my pandemic survival vehicle a few weeks ago where I came too close to a telephone pole, brushed with right arm and pulled me into it literally pulling the front of the bike sideways towards the pole and throwing me off onto the sidewalk onto my left shoulder. Shook me up but worst damage was to bike. Got home, trued wheel but it’s also slightly out-of-round (planning to use your trick next) but also discovered a slight crease or dimple. That’s become annoying as I have rim v-brakes on the bike and so every time now when that spot goes past I get the jerking thump-thump-thump shaking the front of the bike as I brake to a stop. Annoying. It’s possible the out-of-round condition could be contributing to that, or the out-of-round may be from that dimple. We’ll see the next time I work on it. But for now, open to any suggestions including just getting a new or used better wheel and be done with it, lol. It’s an old bike and just wanna keep it as stock as possible like when I bought it. Nostalgia.
Hi, Destin. There are two ideas behind and out-of-round fix. (1) It is secondary to the side-to-side issue. Fix that first, so at least your brakes work. (2) It uses the same principle of tightening and loosening spokes, but your measurement needs to change to a different location. Hence, the tape strung across the fork.
When you turn an out-of-round wheel with the tape as a measure, sometimes the rim will come close to the tape (maximum point) and sometimes it will be furthest away (minimum point). At the maximum, you want the rim pulled in; tighten a spoke on each side. A the minimum, you want the wheel to relax; loosen a spoke on each side. Repeat as necessary, adjusting the tape as needed.
At this point, another suggestion is warranted. A wheel with an actual dent in it is a wheel with a weak point. This “feature” may rub your inner tube, causing flats, may rub away your brake pads over time and make braking annoying, and may even crack. Anything is better than this, even an old, semi-loved wheel heavily discounted on Craigslist. Be on the lookout for a replacement set, while keeping the rest of your bike stock.
the Park Truing Stand you picture for $50.00-$80.00 is really $300.00. Wish I could get it for that price.
Good observation! We’ve fixed the photo caption accordingly. And no, we can’t get a Park tools stand for significantly under $300 either.
Thank you for this. I like tinkering with my toys but never trued a wheel… until tonight. Your instructions were spot on and easy to follow. Thank you for this!
Happy to simplify cycling, Fred. Glad it worked!
Out of all the possible bike maintenance I could do on my bike, truing a wheel is the worst, most painful to do. I have watched so many videos on YT, read all I could online and have somehow managed to make my rims look as if they passed over a road side bomb. I rather pay double or even triple the price if it means I don’t have to do it.
I agree! Back when I had almost no dollars for bike maintenance, this was the only task I ever paid others to do. But if you’ve got to do it yourself, this is the easiest way with no equipment.
I was thinking about a truing stand, but also thought if you ride for exercise and hobby, aren’t your wheels going to take hits frequently, and become a tad wobbly? So if you use this method, keep them in relatively decent true- not microscopic true- like maybe a professional would require, wouldn’t that fit the bill?
But since I have tool fever, maybe I’ll use some truing stand savings and buy one of those pricey-but not wheel truing stand pricey, Park 4th hand tools since I’ll be able to get my brake pads a little closer together after taking the bumps out of the rim!
Paul, it’s important to distinguish between usage stresses and impacts. Usage stresses are the combined forces of vibrations, pushing, and pulling on your spokes over typical (or hard) riding, with about a few dozen threaded spokes spinning around the whole time. Eventually something’s going to give, and trying a slight wheel wobble is a way to get that balance back.
An impact is a different story. Hit a pothole edge or curb hard enough and the spoke threading gets partly pulled apart. Or a spoke breaks. Or the rim dents. Or all of the above. Then it’s enough of a fix job that you’re weighing the improvement you can make vs. the cost of a new rim and possibly wheel.
You’ll know first in the brakes that a stand is a good investment. You may not see it without looking, but one brake pad will grab and your wheel slows prematurely. Happens once? Jury-rig it like this. Happens a lot? Maybe a stand is on order. Or some better spokes. Or a better rim…
What’s the fix when the wheel is not out of round but the tire tread is?
The tire may not be properly seated all the way around. Deflate, go around each side of the tire, pushing in with your thumbs, then reinflate.
If that doesn’t fix it, then your tire may be out of round from sitting underinflated. A week or two at full pressure should help.
Great video and info. What do you suggest for disc brakes?
Thanks, Skip. It’s harder with disc brakes, as you’ve got no central rim reference point. And it’s not like you can mount something there temporarily, because it might skew to one side or another.
Instead, I’d use a ruler and a light-colored crayon. Mark the center point of your frame where a rim brake would be, then the center point of your tire tread at various points around the road surface. Then spin your tire and look endwise. If not trued, your tire will hop all around vs the frame mark. When your tire goes right, hit the brakes and then loosen right and tighten left at the top of the wheel. Reverse it for the other side. Repeat until trued.
that was cool simple easy to the point thank you so much and god bless you
The Steps to Removing the Rear Bike Wheel Without Quick Release: It’s wise to lay your bicycle down on its side with the chain facing up. This next step is done by shifting your gear to the smallest cog and having your chain on it. The third step is to disengage the brakes. This depends on what type of brake your bike is using. The fourth step is to loosen the wheel nuts to detach the derailleur. Simply stand behind the bike. Stabilize the frame with your left hand. Place your right thumb on the wheel nut. Then, use your right fingers to pivot the derailleur all the way back. The rear wheel was completely removed from your bike.
Good advice. Thanks for sharing!
Some bikes come with a quick-release axle that you can pull up the lever, turn a few times, and remove in a jiffy.
Wheel Removal ( Rear Wheel ): First lay down your bicycle to one side and shift derailleur to the outermost gear and innermost front chain ring. Then Disengage rim brake release mechanism and Wheel from the frame, then pull back on the rear derailleur to allow the cogs to clear the chain. Lower the wheel, guiding the wheel down through the brake pads and forward to clear the chain and derailleur.
Good words of advice, especially about shifting the the smallest cog first. This eliminate the problem of no knowing where the chain aligns when you’re done.
How often should a bike be serviced? After initial service, you should do major service each 12 months with a minor check up at each change of season. It’s what really advised, but it really does depend on how much you ride, and what kinds of conditions you’re riding in. Heavy use, rain, mud and dust all mean more frequent servicing.
Measuring tape from the dress shop taped across the forks can quickly disclose the extent of wobble. Buy a nice ratchet bar clamp and spreader ($6 US) There are a lot of inventive ideas. The technic in your article is the key.
Tire changing is part of bike maintenance. It’s an important factor that can affect the performance of your bike. But before you do this, it’s a good idea to know how much it costs to change a bike tire, which can save you money and ensure your bike is still performing at peak performance. To replace a low-end bike tire, it will only cost you between $12 and $50 per pair. Entry-level mountain bikes are priced at around $20 to $70 a pair. Or you can invest in your car with good quality tires, which range in price from $75 to $150 per pair.
Good advice…even though this article was about wobbly wheels, not tires : )
Good advice, but my fat tire ebike with rear hub motor is a bit of a different situation. I have one spoke that won’t tighten (stripped threads?), and a tire that keeps coming off the rim. My brakes are disc brakes, so using the brake pads to judge by is not possible. Replacement parts take weeks to get here, if they can be shipped here at all. The nearest bike shop is a 3 hour flight away.
Interesting, Ralph. Thanks for writing. The spoke issue and the tire issue may or may not be related. For now, let’s treat the spoke as the cause.
A spoke that won’t do its job of pulling the wheel is like having a belt that won’t cinch; eventually your pants fall down. We need to get a replacement spoke in place. But measuring a spoke can be complex, including length from tip to J-bend, and the gauge of the wire—and then buying a suitable replacement. A SHORT-TERM solution is to mark it with a Sharpie or piece of tape and to plan around it, using the two opposite spokes pulling away, and the two outside that, to bend the rim as needed. It won’t be perfect, and you’ll be putting more stress on the other spokes, but that can get you going in a pinch.
As for the tire, look for a damaged bead (the edge lip of the tire) on the side that’s coming off. Then look for a park of the rim with on that side a crimp in it, such as from hitting a curb. If the rim is good, and the tire is good, you may need just a little boost to keep the tire in. A substantive tire liner like Tannus Armour can add lateral stability that keeps the tire from coming off. And if it does anyway, Tannus Armour is “ride-flat capable”, so you can still ride back safely with a flat.
My $.02,
Bob
I think it would be good to say how to tell which spokes need to be tightened, how much, and why. The masking tape tells me how out-of-round the wheel is but not what to do.
You’re right, Matthew. Now that I know this is a popular topic, I should refilm it with proper equipment!
Bob,
Thank you for your fabulous instructions. I’m an old guy who hasn’t trued a wheel in a long time and who’s memory is clouded. The part that I couldn’t get straight was what was clockwise and what was counter clockwise. It depends on how you look at the nut. I know that it’s natural for most people to understand but my mind gets cloudy. So I modified your Steps list to add Tighten above Clockwise and Loosen above counter clockwise. And I added (to be absolutely clear) “Looking down on rim”.
Thanks, Harold. You are absolutely correct. Looking in from the rim.
Others have mentioned how I could have done a better job filming that aspect. Ironically, I never expected this video to take off the way it did; I just received an annoyingly warped rim one day, and decided to film the fix on a phone while doing as much work as possible with my other hand… and I couldn’t actually tighten spokes with one hand!